Big Walk Red Tower Puzzle Solution
The Red Tower is the intro tower. The solution is: line up on the red pad, walk the lead walker onto the pressure plate, then have the rest cross one at a time so the bridge stays down. The run fails if two walkers step off the plate together. Below you will find the exact map location, the full walk order, and the mistakes that end most attempts.
Overview
The Red Tower teaches the core loop of Big Walk: a line of walkers, pressure plates, and bridges that only stay down while weight is on them. Treat it as the tutorial for every tower after it. Nothing here is timed, and nothing respawns against you — the only enemy is a group that moves before it has a plan.
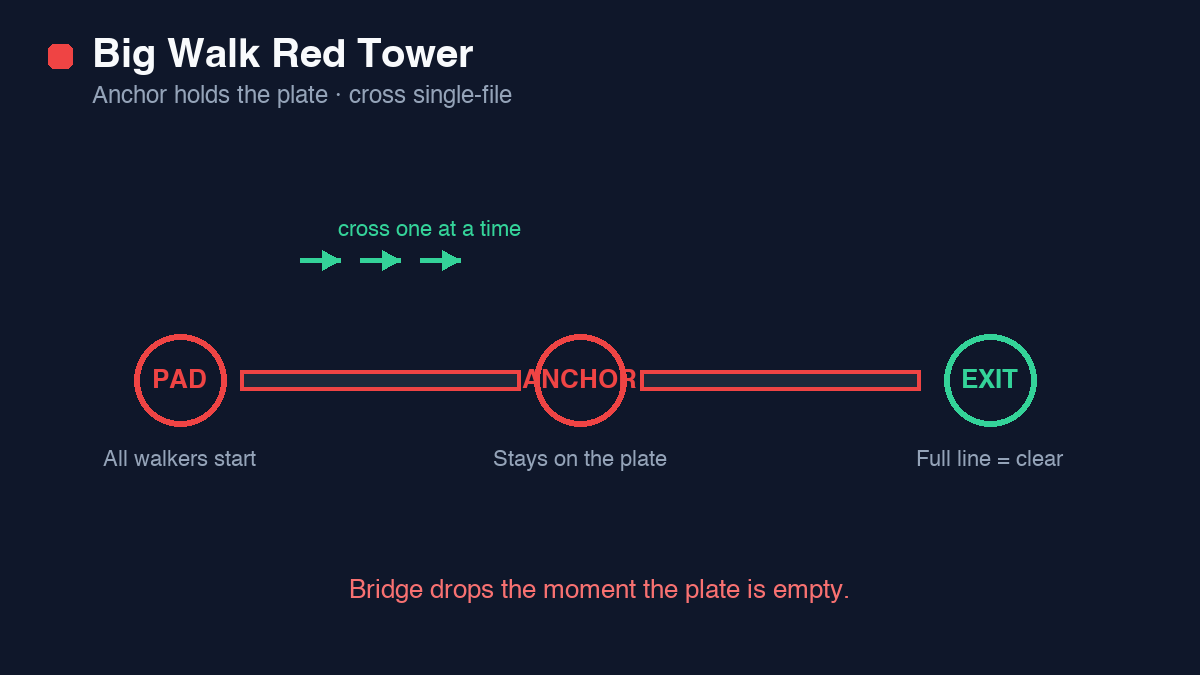
The puzzle has three active parts: the red start pad at the base, the bridge it lowers, and the anchor plate on the far side. Understand how those three trade weight between them and the tower solves itself.
Where the Red Tower is on the map
The Red Tower is the first color tower on the main walk. From the starting meadow, follow the path out of the tutorial stretch and look for the red beacon glowing on the horizon. The tower stands at the top of a short rise, and the red pressure pad sits directly at its base, so you cannot miss the trigger once you arrive.
Because it comes first, the game uses the approach to teach you two habits worth keeping for the whole run: walk as a group instead of scattering, and read the ground for plates before you step onto a bridge. Every later tower assumes you learned both here.
If the beacon is not visible, you have walked off the main path — turn back toward the tutorial gate and the red glow comes back into view within a few steps.
What you need
- At least 2 walkers (the puzzle is solvable solo but built for co-op).
- One walker willing to be the "anchor" who never leaves the plate.
- A voice call or quick chat agreement on the crossing order before anyone steps on the pad.
Solo vs co-op strategy
Big Walk scales its puzzles to whoever is walking, and the Red Tower is the clearest example. The layout never changes; only the number of walkers you have to coordinate does. Pick the version below that matches your group and follow it exactly on your first attempt.
Solo
Alone, you play every role yourself. Step on the red pad to drop the bridge, then cross at a steady pace and park on the anchor plate. The margin is tighter because there is no second walker to hold weight while you reposition, so move deliberately and never jump on the bridge — a bounce off the plate is the most common solo fail.
Co-op
In a group, split into two roles before you start. The anchor crosses first and commits to the far plate for the entire run. Everyone else crosses single-file behind them, one walker fully across before the next steps on. Two walkers work fine; four or more just means a longer queue, not a harder puzzle.
If you are playing on Switch 2 or PS5 with local friends, put the calmest player on anchor duty — it is a boring job, and that is the point. On Steam with remote players, ping the far plate in chat before the first crossing so the role is locked in writing.
The three mistakes that fail most runs
- Rushing the bridge together. The moment the plate empties the bridge retracts and everyone on it falls. The fix is discipline: the anchor holds, the others cross single-file.
- No assigned anchor. If nobody owns the far plate, the first walker across tends to wander off to explore, the bridge snaps back, and the rest of the group is stranded on the wrong side. Name the anchor out loud before the pad is touched.
- Leaving a straggler behind. Groups that regroup at the top without checking the count force someone to backtrack across a live bridge. Count heads at the far side before climbing.
Notice what all three have in common: none of them are puzzle-solving errors. The Red Tower fails on communication, not logic. Slow down, say the plan out loud, and the tower becomes a two-minute formality.
Where to go after the Red Tower?
After triggering the exit plate at the top of the Red Tower, the southern ravine gate unlocks and drops a long suspension bridge over the river gorge. Groups frequently wonder which path or tower to tackle next:
- Recommended Next: The Green Tower (Valley Basin). Cross the suspension bridge and follow the trail descending northwest. The Green Tower introduces laser beam routing and mirror alignment, which is the natural progression in difficulty.
- Alternative Route: The Blue Tower (Reservoir Dam & Slope). If you follow the river upstream toward the massive concrete dam wall, you will arrive at the Blue Tower (frequently referred to as the "Blue Building" or "Blue Slope").
- Trail Navigation Tip: Keep your walkie-talkies equipped and listen closely. When you walk in the direction of an active tower, the audio beacon clicks accelerate in frequency.
A clean-run checklist
- Assign the anchor before you start — call it out in voice chat.
- Agree on the crossing order while everyone is still on the pad.
- Anchor crosses first and does not move again until the chime.
- Cross one at a time; wait for a full stop before the next walker steps on.
- If a walker falls, the anchor stays; the fallen walker respawns at the pad.
- Regroup and count walkers at the far side before the climb.
- Trigger the exit plate as a full line for the clean completion.
Step-by-step
- Stand on the red pad. All walkers gather on the red pressure pad at the tower base. While the pad has weight on it, the first bridge stays lowered. Do not let anyone wander off before the order is agreed.
- Send the lead walker across. The front walker steps onto the bridge and stops on the far anchor plate. That plate holds the bridge down for the group, so the rest of the pad can safely empty.
- Cross one at a time. Remaining walkers follow single-file, each waiting until the walker ahead is fully across. Never let both plates sit empty at the same moment or the bridge retracts and drops whoever is on it.
- Regroup before the climb. Wait at the far side until every walker is across. A straggler left on the start pad means someone has to backtrack, which is where most resets happen.
- Climb as a line. Move up the tower together and keep the group tight. The Red Tower has no timer, so there is no reason to sprint the stairs.
- Hit the end plate together. At the top, the whole line stands on the exit plate at the same time. That triggers the tower's completion chime and opens the path onward.
Frequently asked questions
Where is the Red Tower in Big Walk?
The Red Tower is the first color tower you reach on the main walk, shortly after the tutorial stretch. Follow the red beacon on the horizon from the starting meadow; the tower sits at the end of a short rise with the red pressure pad at its base.
What is the Red Tower solution in Big Walk?
Line up on the red pad to lower the bridge, send one walker across to hold the far anchor plate, then cross the rest single-file. Finish by standing the full group on the exit plate at the top.
Why does the Red Tower bridge keep retracting?
The bridge is held by a pressure plate. If the plate is empty — e.g. two walkers step off at once — it retracts. Keep at least one walker on a plate at all times: first the start pad, then the anchor plate on the far side.
Can you solve the Red Tower solo?
Yes. A single walker can lower the bridge, sprint across, and hold the anchor plate alone. It is slower and tighter than co-op, but there is no hard player-count requirement.
Is the Red Tower required?
It is the gateway tower; completing it opens the path to the later towers, so yes. It also teaches the pressure-plate logic that the Black, Green, Blue and Yellow towers all build on.
What happens if a walker falls off the bridge?
The fallen walker respawns at the start pad. The anchor on the far plate should not move; the respawned walker simply crosses again once the bridge is stable.
How long does the Red Tower take?
A coordinated group clears it in a few minutes. Most of the time goes to agreeing on the anchor and the crossing order, not the puzzle itself.
Where do you go after the Red Tower in Big Walk?
After completing the Red Tower, follow the newly opened cliffside path heading northwest across the river gorge. Most teams proceed to the Green Tower in the valley basin or follow the river upstream toward the Blue Tower reservoir.
Related Big Walk guides
- Big Walk Black Tower Puzzle Solution: Pulse Timing & Gate GuideSolve the Black Tower in Big Walk: exact 3-pulse timing gate count, which pulse to cross on without resetting, and step-by-step diagram for 2-4 walkers.
- Big Walk Green Tower Puzzle Solution: Reflector Angles & Dual BridgesBig Walk Green Tower guide: laser beam routing, reflector angle setup to extend both bridges, and the exact sequence to prevent dropping teammates.
- Big Walk Blue Tower Puzzle Solution: Exact Valve Height & Water Drain GuideStuck on the Blue Tower (Blue Building & Slope) in Big Walk? Step-by-step valve settings, how to keep the mid-level crossing ledge from vanishing, map location & solo guide.
- Big Walk Yellow Tower (Final Tower) Solution: Beam & Water FinaleBig Walk final Yellow Tower solution: plate, laser beam, and water sequence solved bottom-up, plus team role assignments and reset recovery.
- Big Walk Tools & How to Use Them: Complete Equipment GuideEvery Big Walk tool explained: Reflector, Valve, Plate Anchor, Counter, and Beacon. Exactly when to use each gadget and combo tips that break puzzle locks.
- Big Walk Co-op / Crossplay Not Working? Connection Fixes (PC/PS5/Switch)Big Walk co-op and crossplay troubleshooting: expired join code fixes, strict NAT workarounds, PC-to-console invite bugs, and stuck walking lobbies.
- Big Walk Walkthrough: All 5 Towers, Puzzle Solutions & Map Guide (2026)Complete Big Walk walkthrough: recommended tower progression order, unstuck and respawn tricks, tool combos, and essential tips for co-op groups.